
Charles Miller
Founder at - FlybyWheelCharles Miller is a veteran bike enthusiast with over 12 years of experience dealing with bikes as a mechanic. Despite immense love and expertise for...
Just as a caterpillar transforms into a butterfly, so too can your ordinary bike morph into a powerful electric machine. We're here to guide you through this process, showing you how to select the right components, install them efficiently, and set up your bike for optimal performance.
It's not as hard as you might think, and the benefits can be significant. So why not stick with us, and find out how you can turn your everyday ride into a high-speed, eco-friendly powerhouse?
- Key Takeaways
- Understanding Electric Bikes
- Essential Tools and Materials
- Choosing the Right Bike
- Selecting an E-Bike Kit
- Installing the Motor
- Adding the Battery
- Setting Up the Controller
- Attaching Throttle and Brakes
- Testing the E-Bike
- Maintenance and Safety Tips
- Frequently Asked Questions
- Conclusion
Key Takeaways
- Choose a suitable bike with a strong frame and compatible wheel size for conversion.
- Select the right electric bicycle conversion kit, considering factors like voltage, capacity, and compatibility.
- Understand the mechanics of the chosen bike thoroughly and ensure the frame can handle the additional weight and power.
- Follow the manufacturer's instructions for installation of the motor, battery, controller, throttle, and brakes, and test for functionality and safety.
Understanding Electric Bikes
First, we need to choose a suitable bike for conversion, ensuring it has a strong frame and compatible wheel size for the electric bicycle conversion kit we select, taking into account factors like voltage, capacity, and compatibility. When building an electric bike, the DIY electric approach demands precision. We must understand the mechanics of our chosen bike thoroughly. Its frame must be robust enough to handle the additional weight and power from the ebike kits.
Next, we delve into the heart of electric bicycle conversion – the selection and installation of the ebike kits. Each kit varies in terms of voltage, capacity, and compatibility; hence, we must choose wisely. Some kits might offer higher speed, while others offer better hill climbing abilities. Our choice should reflect our riding needs and the local regulations.
Understanding electric bikes also involves getting familiar with the process of wheel replacement and installing the kit components. We'll need to replace the standard bike wheel with the motorized wheel, connect the throttle, and install the battery. This whole process calls for technical competence and attention to safety precautions, especially when handling the battery.
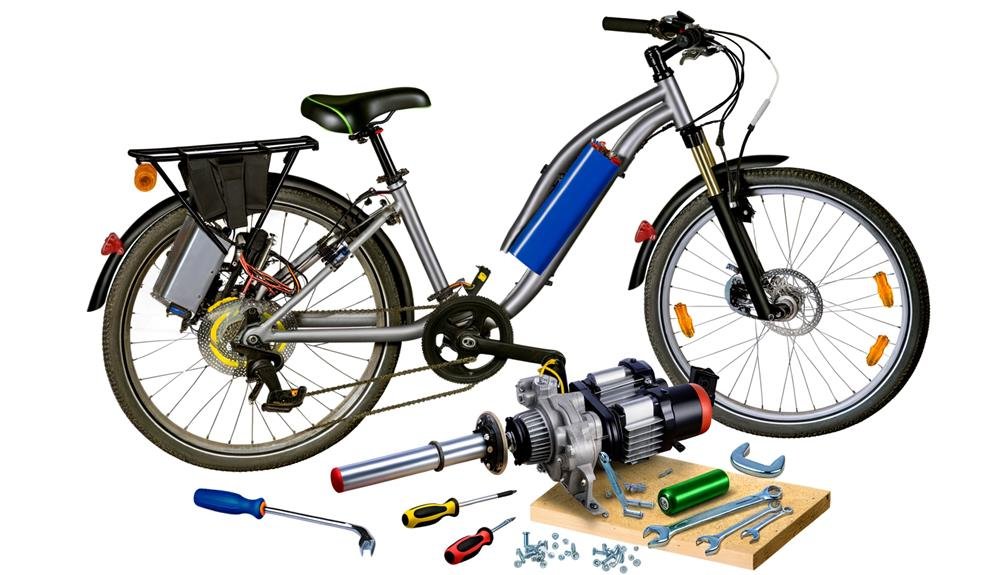
Essential Tools and Materials
To start the conversion process, we'll need some essential tools and materials such as a wrench and socket set, screwdrivers, pliers, wire cutters and strippers, and Allen keys. These tools are vital to successfully build an e-bike. Our wrench and socket set will handle the removal and installation of bike components. Screwdrivers and Allen keys come in handy for adjusting and securing various parts.
When dealing with the electrical aspect of our DIY ebike, pliers and wire cutters become indispensable. We'll use them for handling cables and wires and making clean, safe electric connections. Don't underestimate the importance of these tools in your kit.
Alongside these essential tools and materials, we'll also need a good quality conversion kit. This kit typically includes a hub motor, which is the heart of our e-bike. It transforms our regular bike into a powered one. Choosing the right conversion kit is crucial, as it determines the performance of our e-bike.
Choosing the Right Bike

Now, let's dive into the crucial task of picking the right bike for our electric conversion. Choosing the right bike is a crucial step when we decide to build one ourselves. We start this process at local bike shops, looking for a mountain bike with front disc brakes and wide handlebars. This set-up provides the stability and control we need when we convert a bike.
Next, we need to consider wheel size. Options of 26, 20, or 16 inches are ideal, giving us the flexibility to tackle various terrains and speeds. Also, we need a bike frame that can handle the extra weight and stress of an electric conversion kit. A strong, standard bottom bracket is essential.
Avoid carbon fiber frames or forks. They mightn't withstand the additional strain that the electric components impose. Instead, opt for wider handlebars. They offer more accessory space, providing room for the additional components of the electric conversion kit.
Selecting an E-Bike Kit
After securing the ideal bike, our next step is selecting an e-bike kit that fits our bike's wheel size, has a suitable battery, and aligns with our power requirements. As we embark on this journey to make your own electric bike, we need to consider a few critical elements when selecting an e-bike kit.
- Kit Compatibility: Not all electric bikes kits are the same. We need to ensure that the kit we select is compatible with our bike's wheel size and frame design. A popular choice among DIY enthusiasts is the Swytch kit, known for its versatility.
- Battery Capacity: An e-bike kit's battery capacity determines the range of our electric bikes. We should choose a battery that offers a balance between weight and range, ideally providing us with at least 25 miles on a single charge.
- Motor Power: Our kit's motor power influences the speed and torque of our e-bikes. We need to align this with our power requirements, considering where we'll ride and our ideal speed.
- Installation Process: Last, we need to ensure we're comfortable with the build process. The kit should have clear instructions and all necessary components.
Installing the Motor

Having selected the perfect e-bike kit, let's dive right into the installation process, starting with the critical task of fitting the motor. Installing the motor to the bike you already own is a crucial step that requires precision.
The motor type, be it hub motors or mid-drive motors, should match your bike's existing wheel size for seamless integration. This compatibility is vital for the overall functioning of your electric bike.
Here's a quick guide to help you:
| Step | Description | Effect |
|---|---|---|
| Matching | Ensure the electric motor matches your existing wheel size | Optimal integration |
| Attaching | Follow the manufacturer's instructions to attach the motor to the bike's frame | Secure fit |
| Connecting | Connect the motor to the battery and the controller, checking the wiring is secure and properly insulated | Efficient operation |
| Testing | Test the motor to ensure it functions as expected before regular use | Reliability check |
| Adjusting | Make necessary adjustments for optimal alignment and performance | Smooth ride |
Adding the Battery
Now, let's turn our attention to adding the battery.
First, we'll talk about how to choose the right battery for your electric bike, considering factors such as voltage, capacity, and compatibility with your conversion kit.
Then, we'll guide you through the process of properly installing the battery and connecting it to your kit.
Choosing the Right Battery
When it comes to powering your electric bike, we recommend opting for a 36- or 48-volt battery with a capacity of 10Ah or 20Ah. Choosing the right battery is crucial to ensure your bike gets the necessary watts of power.
To make the process smoother, follow these steps:
- Verify the battery voltage and capacity align with your conversion kit for a seamless fit.
- Check if a charger is included with the battery and consider its charging time.
- Seek out a battery explicitly designed for electric bike use.
- Remember, higher voltage batteries provide more power and speed.
Don't hesitate to seek advice from your local bike shop if you feel overwhelmed. They're part of your journey to a greener, healthier lifestyle with your electric bike.
Battery Installation Process
After you've selected the perfect battery for your bike, it's time to secure it to the frame and connect it to the conversion kit. This battery installation process requires precision.
If your bike has a rear rack, you may choose to mount the battery there. Alternatively, you can position it in the water bottle holder or fix it near the bottom bracket, depending on the battery size.
Use secure fastening methods to ensure the battery stays put even on bumpy rides. Follow the manufacturer's instructions carefully when connecting the battery to the kit. Check its functionality, voltage, and capacity compatibility with the kit.
Ensure it's easily accessible for charging and maintenance.
Welcome to the electric bike community!
Setting Up the Controller

Before we mount the controller, it's crucial to locate a secure and suitable position on the bike frame, keeping it away from water, dust, and excessive heat for optimal performance and longevity. We're not just setting up the controller; we're ensuring that our electric bike delivers the best performance possible.
Now, let's get to work. Here's our step-by-step guide:
- Identify a secure location on your bike frame. This will be the new home for your speed controller. Remember, it needs to be protected from the elements for it to last.
- Get the wires from the motor, battery, and throttle ready. We're going to connect these to the corresponding terminals on the controller. Make sure to follow the manufacturer's wiring diagram.
- Once everything is connected, securely fasten the controller to the frame. We can use zip ties or mounting brackets. We don't want any movement during our rides, do we?
- Test the controller's functionality. We need to turn on the system and check for proper motor response before securing all connections.
We've now accomplished setting up the controller. Remember, the journey to building our own electric bike is as exciting as riding it. It's not just about the bike and its accessories; it's about belonging to a community of DIY enthusiasts who enjoy the thrill of innovation and discovery.
Attaching Throttle and Brakes
Now, we'll tackle the task of attaching the throttle and adjusting the brake mechanisms on our electric bike.
This involves securely fastening the throttle to the handlebars, connecting the necessary wires, and installing the electric brake levers.
We'll also take measures to ensure that these components are functioning correctly before we take our bike out for a spin.
Throttle Installation Process
Let's begin the throttle installation process by mounting it on the handlebars in a location that's both convenient and within easy reach. Ensuring this will help you handle the extra torque and speed once we make your own electric bike functional.
To make the process clearer, we've broken it down into four steps:
- Mount the throttle to the handlebars. Make sure it's conveniently positioned for easy access.
- Connect the throttle to the motor controller. Check all wiring to ensure functionality.
- Now, install the brake levers and connect them to the motor controller. This ensures safety and control over your bike.
- Lastly, test the throttle and brakes for responsiveness and functionality. Adjust positioning and sensitivity as needed.
Adjusting Brake Mechanisms
In order to achieve a smooth and safe ride on your newly converted electric bike, it's crucial we adjust the brake mechanisms and attach the throttle and brakes correctly. When choosing brakes, disc brakes are ideal for their better stopping power. You can install them on the front or back, depending on your preference. They're also easier to install, making the process less daunting.
We want to ensure the throttle and brakes attach securely to the handlebars, so they're within easy reach and comfortable use. It's also essential to adjust the brake cables for an efficient braking mechanism.
| Steps | Description |
|---|---|
| Attach Brake Levers | Adjust for easy reach and comfortable operation |
| Connect Throttle | Position for easy access while riding |
| Adjust Brake Cables | Ensure proper tension and alignment with brake pads |
Testing the E-Bike

Before hitting the road, we need to meticulously examine our e-bike, making certain that all components are securely fastened and in top-notch condition. Testing the e-bike is a crucial step in our 'make your own electric bike' guide, and it's a process we should approach diligently.
- Start by conducting a thorough visual inspection, paying close attention to both the rear wheel and front wheel. Nothing can spoil our ride faster than a loose component or an unforeseen mechanical issue.
- Next, we test the brakes. The added weight of the electric components can significantly affect braking efficiency, so it's important to ensure they're responsive.
- Now, let's engage the motor and battery. Take the e-bike for a short test ride in a safe, open area. Feel the power and assess the assist levels.
- Lastly, verify the battery's life and range. Try to go several miles per charge to gauge its performance.
Maintenance and Safety Tips
Now we're moving onto the essential subject of maintenance and safety tips for your DIY electric bike.
We'll cover the basics of electric bike maintenance, emphasize the importance of prioritizing rider safety, and provide key DIY maintenance tips.
Our aim is to equip you with precise knowledge to keep your e-bike in top-notch condition and ensure a safe riding experience.
Electric Bike Maintenance Basics
Keeping your electric bike running smoothly involves regular checks and maintenance on the tire pressure, chain tension, and brakes.
In achieving the electric bike maintenance basics, remember, we're not just building a bike, we're creating a community.
Here's the 4-step plan:
- Regularly clean your bike, especially the back wheel and inner tube, and lubricate the chain to keep it in top shape.
- Routinely inspect the battery, wiring, and connections for signs of wear or damage.
- Always strive to keep the electrical components dry and shielded from water.
- Lastly, keep up to date with the manufacturer's maintenance guidelines and safety tips.
Prioritizing Rider Safety
When it comes to prioritizing rider safety, we've got to make sure our maintenance routine includes a keen focus on the bike's safety features. This is particularly crucial if you've repurposed a mountain bike to be your electric ride.
It's essential to regularly inspect and maintain the controller, ensuring it's functioning optimally. This crucial component controls the power output to the motor and, hence, the bike's speed. An improperly functioning controller can lead to accidents.
Make sure your brakes are well-adjusted and responsive as well. They're your primary method of controlling speed and stopping.
Lastly, frequently check and adjust your bike's lighting system for safe rides in low light conditions.
Prioritizing rider safety is paramount to enjoying your homemade electric bike.
Key DIY Maintenance Tips
In our journey to maintain the longevity and safety of our homemade electric bike, it's imperative that we diligently follow a few key DIY maintenance tips.
- Check and Tighten Bolts: Ensure all off-the-shelf, bolt-on bike parts are secure. Particularly, pay attention to the 72 bolts and connections on your hub motor.
- Lubricate the Chain: Keep it clean to maintain smooth operation.
- Brake Pad Inspection: Wear and proper alignment are essential for safe stopping.
- Tire Condition: Regularly monitor pressure and tread for optimal traction.
Frequently Asked Questions
Can You Build Your Own Electric Bike?
Absolutely, we can build our own electric bike. It's a fun DIY challenge! We'll need a conversion kit, the right battery, and to decide on motor placement. Plus, there are endless customization options!
Is It Cheaper to Build or Buy an Ebike?
"We've found that DIY savings can be significant. Building an ebike often costs 50% less than buying one. However, budget considerations like maintenance expenses should be factored into the cost efficiency of building vs. buying."
How Much Does It Cost to Build a Electric Bike?
We've found that building an electric bike typically costs around $2,200. This includes budget planning for DIY expenses, cost breakdown of purchasing components, and future maintenance costs. It's quite an investment, but totally worth it!
Can You Make a Normal Bike Electric?
We absolutely can electrify a regular bike! We'd need a conversion kit, some tools, and knowledge about electric components. It's not without challenges, but the benefits and sense of accomplishment are definitely worth it.
Conclusion
We've finally navigated the journey of building our own electric bike, a testament to our DIY spirit. This ride isn't for the faint of heart, but once you saddle up, there's no turning back.
It's like the advent of the telegraph – a marvel in its time, but we've taken it steps further. Regular maintenance and safety measures will ensure our e-bike remains a trusty steed.
So, let's hit the road and enjoy the fruits of our hard work.
Charles Miller is a veteran bike enthusiast with over 12 years of experience dealing with bikes as a mechanic. Despite immense love and expertise for his Tacoma, he rides his Trek Ebike more. Anytime you meet him, you’ll either hear him talking about Bikes, or writing about all things bikes and cars on this blog.
More PostsRelated Posts