
Charles Miller
Founder at - FlybyWheelCharles Miller is a veteran bike enthusiast with over 12 years of experience dealing with bikes as a mechanic. Despite immense love and expertise for...
Despite some misconceptions, converting a road bike to an electric one isn't as daunting as it might seem. We're here to guide you through each step, from choosing the right components to the final adjustments.
We'll address the complexities of selecting the right motor, the intricacies of wiring, and the importance of a well-placed speed sensor.
But what if you could cruise uphill with the same ease as you coast downhill? Stay with us, and we'll show you how embracing electric power can transform your cycling experience.
Key Takeaways
- Consider the type of road bike and motor that best suits your needs, taking into account factors such as frame material, potential failure risks, and features like water bottle mounts and accessible cables.
- Research reputable vendors and ensure proper fit and clearances for the motor on the bike.
- Pay attention to the installation process, including correct removal of the bottom bracket, choosing the right chainring size, and securely setting up the control unit and throttle.
- Properly install the speed sensor, ensuring accurate readings and optimal performance, and conduct thorough checks and adjustments to ensure all components are securely installed and functioning correctly.
Choosing Your Road Bike
When embarking on the journey of converting a road bike to an electric bike, selecting the right base model is critical. We recommend starting with a road bike that rides well and is familiar. It's always better to convert a bike you're comfortable with.
If you're searching for a new base, consider your local bike shop. They'll offer a variety of road bikes – steel frame models being sturdy and cost-effective options. However, be cautious of hidden rust. Aluminum frame road bikes are more common but may have potential failure risks due to their lightweight design.
An important aspect of ebike conversion is ensuring your bike is compatible with the Bafang kit, or any other bike motor you choose. Some older or unique bikes might require specialized tools for preparation. Features like a large front triangle, water bottle mounts, and accessible cables significantly increase the chances of a successful conversion to an electric bike.
The conversion process can seem daunting, but it's a unique journey we're all part of. We hope this guide helps you feel more confident in your decision-making and brings you one step closer to the freedom of an electric ride.
Selecting the Right Motor
Having selected a suitable road bike, our next step is to focus on choosing the right motor, a crucial component that determines the performance and efficiency of our electric bike conversion. Selecting the right motor involves several considerations.
First, we must decide between a hub motor and a mid-drive motor. While a hub motor drives the rear wheel directly, a mid-drive motor provides higher performance and torque, making it an excellent choice for challenging terrains.
Next, we need to consider the battery voltage options. We've 36v, 48v, and 52v options available, the higher the voltage, the longer-lasting power it provides. It's essential to balance between power needs and battery life.
Researching reputable vendors is also crucial for our project. Luna Cycle is a reliable choice, known for their excellent customer support and information. They offer various motor models, including the affordable Bafang BBS02 and the high-power BBSHD.
Lastly, we must ensure the motor's fit and clearances on the bike. It's important to verify compatibility and adequate space for installation.
With these factors in mind, we'll be well-equipped to make an informed decision.
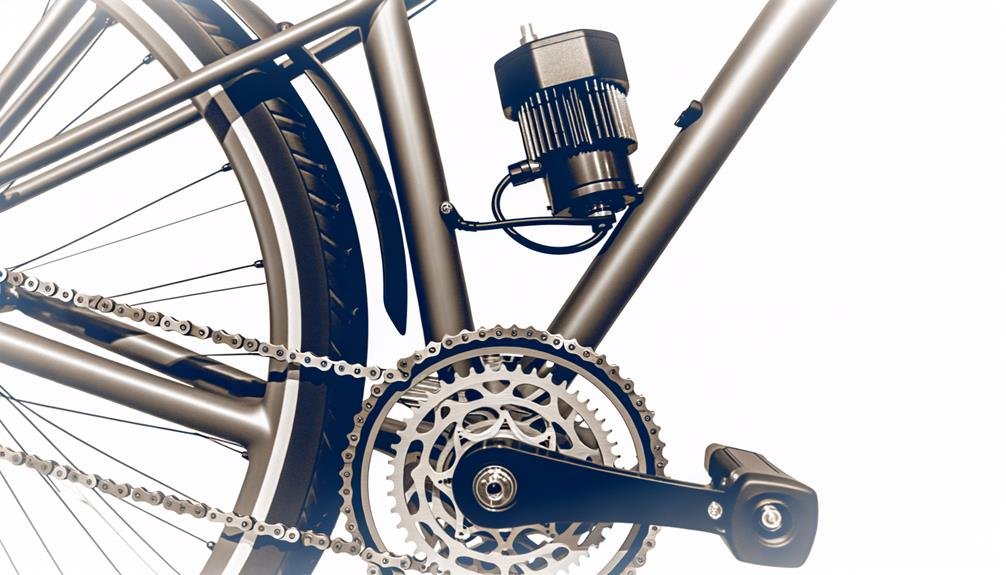
Installation of the Motor

Now, we'll frequently refer to tutorial videos or comprehensive guides to ensure the bottom bracket is removed correctly as we begin the installation of the motor. This is the heart of the conversion where we fit the electric motor to your bike, enabling it to harness power from the battery pack. It's crucial to use the right tools to avoid damaging your bike.
To make this process easier, we've summarized the steps into five key points:
- First, ensure the bottom bracket is removed correctly. This is where your motor will be installed.
- Next, you need to choose the right chainring size. Smaller chainrings are best for climbing hills, larger ones for flat terrains.
- Fit the chainring to the motor. Ensure it's securely attached to avoid any mishaps.
- Then, clean the bracket slot to ensure a smooth installation of the motor. Your bike's performance depends on this.
- Finally, consider the gearsensor installation and removing the front shift cable and derailleur.
Wiring and Connectivity
Diving into the realm of 'Wiring and Connectivity', it's critical to grasp the requirements for connecting the motor, battery, and controller to ensure a flawless integration. This task requires meticulous attention to detail, especially when incorporating brands like Bafang motors.
In setting up the control unit and throttle, it's important to secure the wiring harness properly to avoid any interference with the bike's moving parts. This setup should also take rider comfort into account, ensuring the wires don't obstruct your ride.
Next, the brake sensor needs to be wired correctly to the brake cable. This sensor ensures the motor cuts off when you apply the brakes, providing an essential safety feature for your electric bike. It's crucial to verify the compatibility and functionality of these components with your existing bike setup.
Lastly, don't forget about the front light. This component, while not directly related to the propulsion of the bike, is fundamental for safety. As with all other components, ensure it has a reliable and waterproof connection to the rest of the system.
In the end, the goal is to have a seamless integration of all electric components, guaranteeing a smooth, efficient, and safe ride on your newly converted electric bike.
Installing the Speed Sensor

Next, we'll tackle the task of installing the speed sensor.
We'll begin with the proper placement of the sensor on the bike's frame, ensuring it's mounted securely and close to the wheel magnet.
Following that, we'll guide you through the calibration process to guarantee accurate speed readings.
Sensor Placement
Where do we position the speed sensor on an electric bike conversion?
As we walk you through how to convert a road bike to an electric bike, one critical component is the sensor placement. This is how we plan to use the speed sensor:
- Locate the mounting points on the bike frame, either front or rear.
- Align the sensor with the wheel's spoke magnet.
- Secure the sensor with zip ties or mounting brackets.
- Adjust the sensor's proximity to the magnet for accurate readings.
- Test the sensor by spinning the wheel and checking for detection.
Lastly, don't forget to remove the bottom bracket to ensure that the sensor is securely placed.
With these steps, we're one step closer to achieving our electric bike conversion.
Calibration Process
Often, we'll start the calibration process by securely attaching the speed sensor to the bike frame. Whether you've got a New York-style road bike or a rugged mountain bike, this step is crucial to ensure accurate speed readings. We typically attach the sensor to the aluminum frames using zip ties, positioning it near the crank arms for optimal performance.
Our speed sensors, many of which come from China, are designed to work in harmony with your bike. They're easy to install, and once in place, all you need to do is use the throttle to test them.
| Step | Tool | Result |
|---|---|---|
| Attach Sensor | Zip Ties | Secure Sensor |
| Position Sensor | Hands | Optimal Placement |
| Test Sensor | Throttle | Accurate Speed Reading |
Final Checks and Adjustments
Let's move on to the final stage of our conversion: conducting thorough checks and adjustments to ensure all components are securely installed, correctly functioning, and optimally adjusted. This critical process determines how much you'll enjoy your new electric bike. It's like double-checking the bottom bracket, the heart of your bike's drivetrain.
Our final checks and adjustments involve:
- Making sure all wiring connections are secure and properly routed. This prevents interference with moving parts.
- Testing the motor mounting and pedal operation. Smooth functionality and clearance are key here.
- Double-checking the chain installation. Necessary adjustments are made for optimal performance.
- Verifying the brake system's compatibility and making adjustments as needed to accommodate the electric bike conversion.
- Test riding the bike. This is to make sure all components are functioning correctly before regular use.
Note that there are two types of checks to be made. One is on the mechanical components, like the Front Derailleur. The other involves the electrical components of your new e-bike. Both are equally important for a safe and comfortable ride.
Let's enjoy the journey together, knowing our bike is in the best possible condition for the road ahead.
Frequently Asked Questions
Is It Worth Converting a Bike to Electric?
We believe it's worth converting a bike to electric. The benefits include upgraded performance, potential resale value, and environmental impact. However, consider the drawbacks like durability and maintenance changes before making a decision.
How Much Does It Cost to Convert a Bike to Electric?
We're looking at a conversion budget of $500 to $1500. This cost breakdown includes necessary equipment and varies between DIY conversion or professional installation. Despite this expense, the financial advantages are noteworthy.
How Hard Is It to Convert a Bike to an Electric Bike?
We've found that the conversion difficulty largely depends on your skill level. With the right tools and safety measures, the DIY process can be manageable and the conversion benefits definitely outweigh the initial effort.
How Fast Can a 1000w Electric Bike Go?
We're often asked, "how fast can a 1000w electric bike go?" Well, it's a wild ride! With ideal conditions, you can hit 28 mph. But remember, battery efficiency, terrain impact, and legal restrictions can affect speed.
Conclusion
So, we've taken you on a journey from a regular road bike to a high-tech e-bike. It might seem like a steep hill to climb, but with the right tools, patience, and guidance, it's as easy as riding a bike!
Just remember to maintain and care for your new e-bike, and you'll be cruising with ease. With this conversion, the wind is always at your back.
Happy e-biking!
Charles Miller is a veteran bike enthusiast with over 12 years of experience dealing with bikes as a mechanic. Despite immense love and expertise for his Tacoma, he rides his Trek Ebike more. Anytime you meet him, you’ll either hear him talking about Bikes, or writing about all things bikes and cars on this blog.
More PostsRelated Posts